


I am sharing a lovely teatime recipe with you today for Golden Tea Cakes. They are also known as Golden Betty's. Probably because they bake up to a lovely golden color and contain the golden warmth of ginger.
The original recipe is a very old one, published in the Farmer's Weekly in the 1920's. I got my recipe via a cookery book entitled Farmhouse Fare. I purchased my copy via Thrift Books. That's where I get a lot of my older books.


WHAT YOU NEED TO MAKE GOLDEN TEA CAKES
Unusual for a British tea cake, these do not require self raising flour. Just some very simple every day ordinary baking larder ingredients!
- 1/4 cup (57g) salted butter
- 1/2 cup less 1 TBS (85g) fine granulated sugar (caster sugar)
- 1 cup (115g) plain all purpose flour
- 2 tsp golden syrup (can use corn syrup)
- 1 tsp ground ginger
- 1/4 tsp baking soda
- 1/4 tsp cream of tartar
- 2 TBS whole milk
- 1 large free range egg, lightly beaten
- 1 cup (130g) icing sugar
- 1 -2 tsp water (as required)
- 6 glace or maraschino cherries, halved (Rinse and pat dry)


Golden Tea Cakes
Ingredients
- 1/4 cup (57g) salted butter
- 1/2 cup less 1 TBS (85g) fine granulated sugar (caster sugar)
- 1 cup (115g) plain all purpose flour
- 2 tsp golden syrup (can use corn syrup)
- 1 tsp ground ginger
- 1/4 tsp baking soda
- 1/4 tsp cream of tartar
- 2 TBS whole milk
- 1 large free range egg, lightly beaten
- 1 cup (130g) icing sugar
- 1 -2 tsp water (as required)
- 6 glace or maraschino cherries, halved (Rinse and pat dry)
Instructions
- Preheat the oven to 350*F/180*C/ gas mark 4. Butter 12 bun tins really well. (I use these.) Place them on a baking tray. Alternately you can use a medium muffin tin.
- Cream the butter and sugar together until light and fluffy. Beat in the golden syrup, ginger, and the egg.
- Sift the flour, soda and cream of tartar together. Add to the creamed mixture alternately with the milk, making 3 dry and 2 wet additions, beginning and ending with dry.
- Divide between the tins equally, filling them about half full.
- Bake in the preheated oven for 15 to 20 minutes until golden brown and a toothpick inserted in the middle of one comes out clean.
- Cool completely before icing.
- To make the icing whisk the sugar and enough water together to make a thick spoonable drizzle icing. Spoon a portion on top of each cold cake. Top with a half cherry. Allow to set.
- Store in an airtight container.

This content (written and photography) is the sole property of The English Kitchen. Any reposting or misuse is not permitted. If you are reading this elsewhere, please know that it is stolen content and you may report it to me at: mariealicejoan at aol dot com


I tend to look through these magazines and then file them in a bookcase that is in the walk in closet in my bedroom. I often forget they are there. I have promised myself that I am going to make an effort to use them more often and so this morning I grabbed this one and picked a few things I wanted to make from it.
There was this one and another one. I couldn't find the ingredients for the other one and so ended up making this. I love chicken thighs and I love potato salad. I was not disappointed.

I was intrigued by the method used to cook the chicken. Bone in, skin on, chicken thighs are opened out, brushed on the underside with some Dijon mustard and cooked, skin side down in a skillet beneath the weight of a heavier skillet placed on top. You can put a brick or some large cans in the top skillet to weigh it down even more.
This results in a lovely crisp skin. Believe it or not the chicken cooks through perfectly in about 15 minutes, tops.
While it is cooking you make a simple potato salad, which has the most delicious herbed vinaigrette dressing. You can see a close-up of it below. Trust me when I tell you that it is fabulously tasty. I do so love a vinaigrette dressed potato salad, don't you?
The recipe is sized for two, but can very easily be doubled or even tripled to serve more people. The combination of the simple fresh flavors of the salad, along with that crispy skinned chicken was for lack of a better word, amazing!

- 3/4 pound (12 ounces/340g) yellow new potatoes (about a dozen)
- fine sea salt and fresh ground black pepper
- 2 medium, bone in, skin on, chicken thighs
- 1 tsp Dijon mustard
- 1 TBS extra virgin olive oil
- 1 TBS white wine vinegar
- 2 tsp prepared horseradish
- 1 spring onion, trimmed, washed and finely chopped
- 2 tsp finely chopped fresh dill
- 2 small radishes, trimmed and finely sliced
- 2 TBS fresh flat leaf parsley, chopped


If you enjoy simple chicken dinners that don't take a lot of effort or time and that are perfectly sized for two people, you might also enjoy the following:
CREAMY GARLIC CHICKEN - Juicy and tender, flavor filled chicken breasts, nicely browned, cooked and served with a fabulously tasty creamy garlic gravy. Simple ingredients put together in the most delicious way. This goes really well with fluffy mashed potatoes.
PARMESAN CHICKEN BAKE - Three simple ingredients and some seasoning, put together simply and baked to perfection. The chicken is tender and juicy, and filled with flavor. Some extra cheese is sprinkled on top to give added crunch. This goes together and cooks quickly. All you need on the side is a few vegetables and perhaps some potatoes or rice.
Crispy Mustard Chicken with Spring Potato Salad
Ingredients
- 3/4 pound (12 ounces/340g) yellow new potatoes (about a dozen)
- fine sea salt and fresh ground black pepper
- 2 medium, bone in, skin on, chicken thighs
- 1 tsp Dijon mustard
- 1 TBS extra virgin olive oil
- 1 TBS white wine vinegar
- 2 tsp prepared horseradish
- 1 spring onion, trimmed, washed and finely chopped
- 2 tsp finely chopped fresh dill
- 2 small radishes, trimmed and finely sliced
- 2 TBS fresh flat leaf parsley, chopped
Instructions
- Scrub your potatoes and then put them into a saucepan. Cover with cold water. Bring to the boil, add 1/2 tsp salt and then reduce the heat and simmer for 12 to 15 minutes, until tender.
- Drain well. Rinse under cold running water to cool off and then drain again.
- While the potatoes are boiling, place the chicken into a cold, large, heavy bottomed skillet, skin side down. Brush the underside with the mustard, dividing it equally amongst the two pieces of chicken. Place a piece of aluminum foil on top.
- Place another skillet on top of the chicken and then weigh it down with 4 or 5 heavy cans.
- Cook the chicken over medium heat until the skin is nicely browned. This will take about 10 to 12 minutes.
- Remove the cans, the top skillet and the foil. Flip the chicken over and continue to cook, uncovered, until cooked through. This will take another 2 to 3 minutes more.
- While the chicken is cooking, whisk the oil and vinegar together in a bowl with the horseradish. Stir in the spring onions and dill.
- Halve or quarter the potatoes, depending on their size. Place them into the bowl. Toss together with the vinaigrette. Taste and adjust seasoning with salt and pepper as desired.
- Fold in the radishes and parsley and serve along with the cooked chicken.

This content (written and photography) is the sole property of The English Kitchen. Any reposting or misuse is not permitted. If you are reading this elsewhere, please know that it is stolen content and you may report it to me at: mariealicejoan at aol dot com


- 1 1/3 cups (160g) grated mature cheddar cheese (sharp), divided
- 2 1/2 cups (300g) plain all purpose flour
- 3 tsp baking powder
- 1/4 -1/2 tsp salt
- 1/2 tsp cracked black pepper
- 4 1/2 TBS (60g) cold salted butter
- scant 1 cup (200ml) whole milk, plus 3 TBS to brush
- 1/3 cup (16g) finely chopped fresh chives


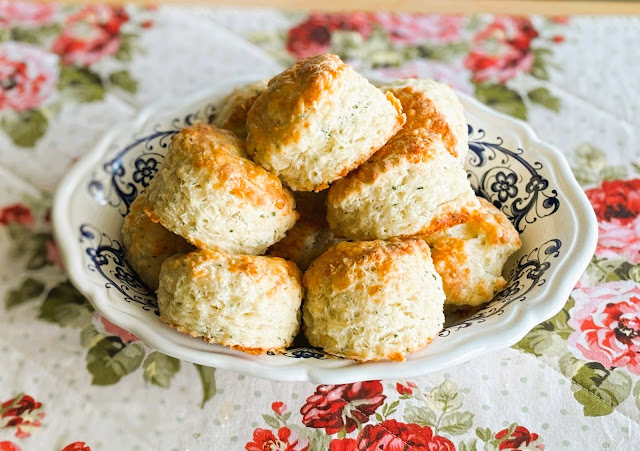
Cheddar Cheese & Chive Scones
Ingredients
- 1 1/3 cups (160g) grated mature cheddar cheese (sharp), divided
- 2 1/2 cups (300g) plain all purpose flour
- 3 tsp baking powder
- 1/4 -1/2 tsp salt
- 1/2 tsp cracked black pepper
- 4 1/2 TBS (60g) cold salted butter
- scant 1 cup (200ml) whole milk, plus 3 TBS to brush
- 1/3 cup (16g) finely chopped fresh chives
Instructions
- Preheat the oven t0425*F/220*C/ gas mark 7. Line a baking tray with baking parchment and set aside.
- Whisk the flour together in a bowl with the baking powder, pepper, and salt. Grate in the cold butter and then quickly rub it into the flour mixture with your finger tips using a snapping motion until the mixture resembles coarse bread crumbs with some pea sized bits.
- Stir in most of the cheese and the chives, mixing everything well together. (Reserve about 1/3 cup of cheese/40g to sprinkle on top at the end.)
- Pour in the milk and mix to a shaggy dough, using a fork. You may need more or less milk. The dough should not be really wet, but it should all come together as well.
- Tip out onto a lightly floured clean countertop and knead gently a couple of times. Pat into a rectangle. Fold the sides over the center and pat out again. Repeat two times more.
- Pat or roll out to a rectangle that is about 1 1/2 inches thick. Using a four inch floured cutter, stamp out 6 to 8 large scones, using a sharp up and down motion. Do not twist.
- Place, well spaced apart, on the baking sheet. Brush the tops with the extra milk and sprinkle the reserved cheese over top.
- Bake in the preheated oven for 15 to 20 minutes, until well risen and golden brown. Remove from the oven and leave to cool slightly before serving, if serving warm.
- Store any leftovers in an airtight container for up to three days. These may be frozen for up to 3 months (baked or unbaked) so long as they are tightly covered.

This content (written and photography) is the sole property of The English Kitchen. Any reposting or misuse is not permitted. If you are reading this elsewhere, please know that it is stolen content and you may report it to me at: mariealicejoan at aol dot com


Social Icons